Mini LUK Self Checking System
The lid of the mini LUK controller (also called the tray or box) is divided into 12 blank squares, the base is divided into 12 numbered squares. There are 12 numbered tiles to work with.
How to use the mini LUK System.
Step 1.
Put the 12 tiles in sequence from 1 to 12 and either place them in the blank squares on the lid of the miniLUK box or place them on the table.
Step 2.
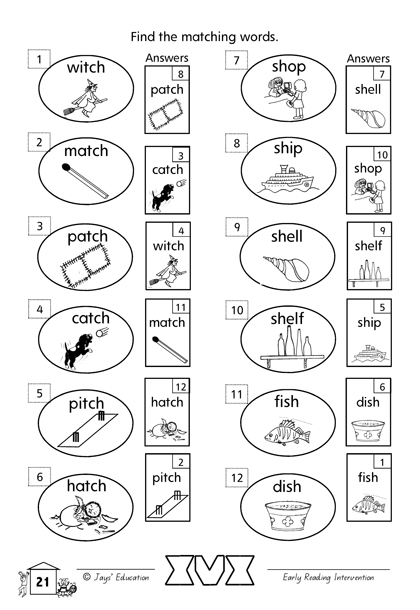
Choose your worksheet (this one is from Early Reading Intervention)
Step 3.
Pick up tile number 1 and place it under or next to the number 1 question. Work out the answer to the problem. Take the tile and place it into the LUK tray on the number matching the answer.
For example, suppose that we are looking at question 1 on the worksheet. The problem is witch. The matching witch is number 4. The tile number 1 will go on number 4.
Now pick up tile number 2 and look at question number 2 question. The picture is of a match and the second match is number 11. The tile number 2 will go on number 11.
Repeat the same procedure until all 12 tiles are in the box.
Step 4.
The tiles are in place, the task is accomplished. Close the lid and turn the LUK box over sideways. Open the lid and a pattern will appear.
Step 5.
Match the pattern in the box with the pattern on the bottom of the page. If the patterns match, well done! You have not made a single mistake! If the pattern is not quite correct, but is recognizable, you have still done a good job.
There are 2 ways to use the LUK Self Checking Program:
- Use the LUK box as you go. Each time, you work out an answer, place the tile in the appropriate square.
- Do the sheet first and when finished, use the LUK controller to check the answers.
The worksheets can all be completed the traditional way too - with a pencil.
|
|
|